Setting up a POS (Point of Sale) system for your restaurant can seem like a daunting task, but with the right guidance, it can be a smooth process. In this article, we'll walk you through the steps of setting up SalesPlay, our all-in-one POS system designed specifically for restaurants. Whether you're a seasoned restaurateur or just starting out, SalesPlay offers user-friendly features that will help streamline your operations and enhance the dining experience for your customers. Let's get started and get your restaurant up and running with SalesPlay!

Setting up and registering for SalesPlay is a straightforward process that can be done through our website.
After completing the registration process, you need to verify your email. You'll receive an email from SalesPlay with a verification link. Click on the link to verify your email address.
By following these steps, you can quickly and easily sign up for SalesPlay POS or log in if you already have an account. If you encounter any difficulties during the process, our customer support team is available to assist you.
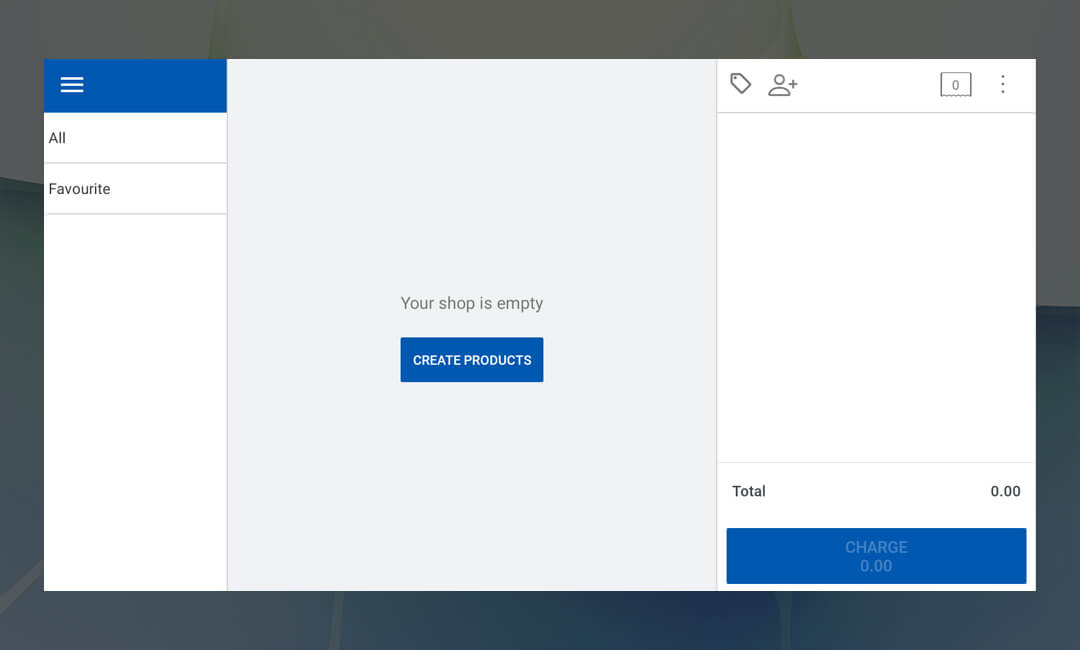
SalesPlay Back Office main menu > Products > Add Product
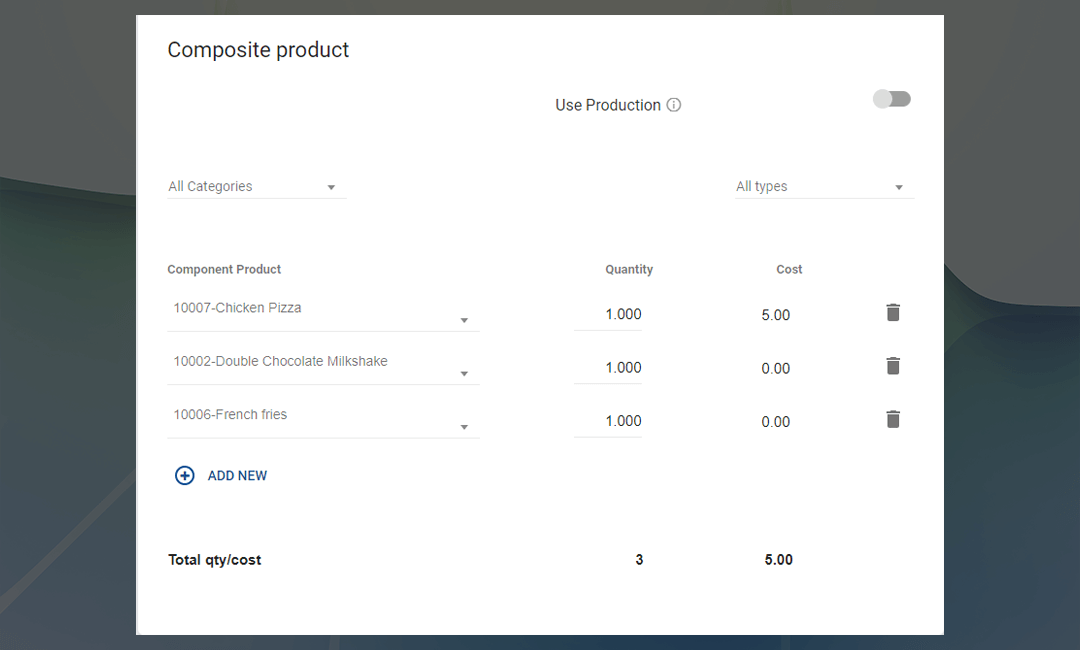
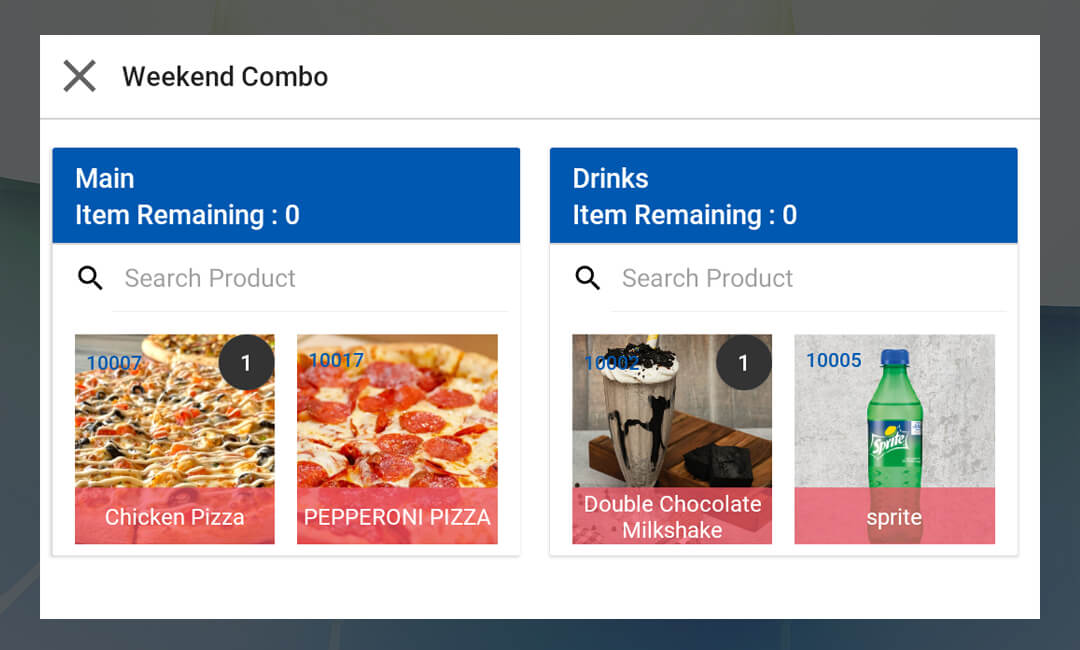
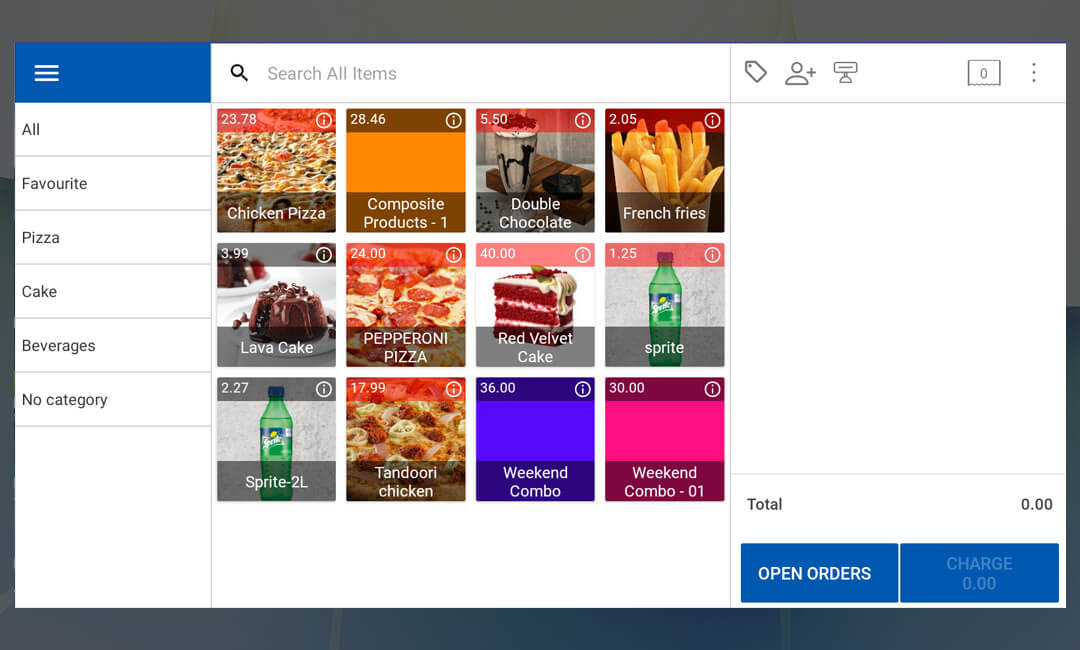
Here's a comprehensive guide on how to add product details, including managing ingredients, composite and combo products in the SalesPlay POS system:
By utilizing the import tool, users can streamline the process of adding or updating product details in the SalesPlay POS system, saving time and reducing the risk of manual errors. If users encounter any difficulties or have questions about using the import tool, they can reach out to the customer support team for assistance.
SalesPlay Back Office main menu > Products > Categories
In SalesPlay POS, creating categories and subcategories is simple. You can easily add main categories and subcategories to organize their menu items effectively. Categorizing items enhances navigation, improves organization, and ultimately leads to a better customer experience. With a well-structured menu, both customers and staff benefit from increased efficiency and clarity in the ordering process.
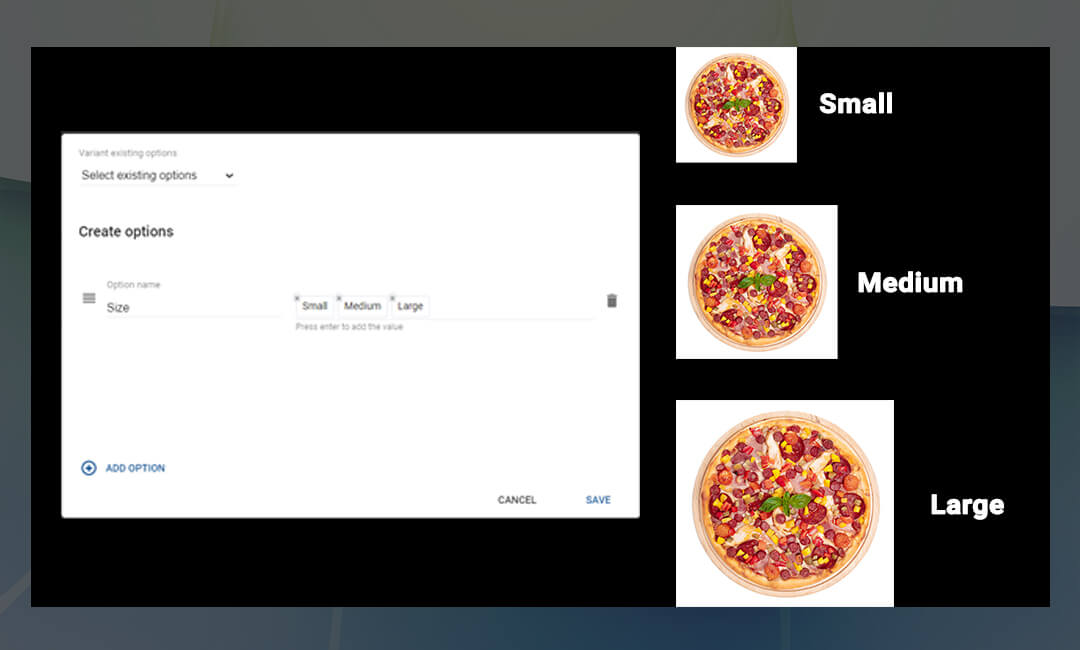
SalesPlay Back Office main menu > Products > Modifiers
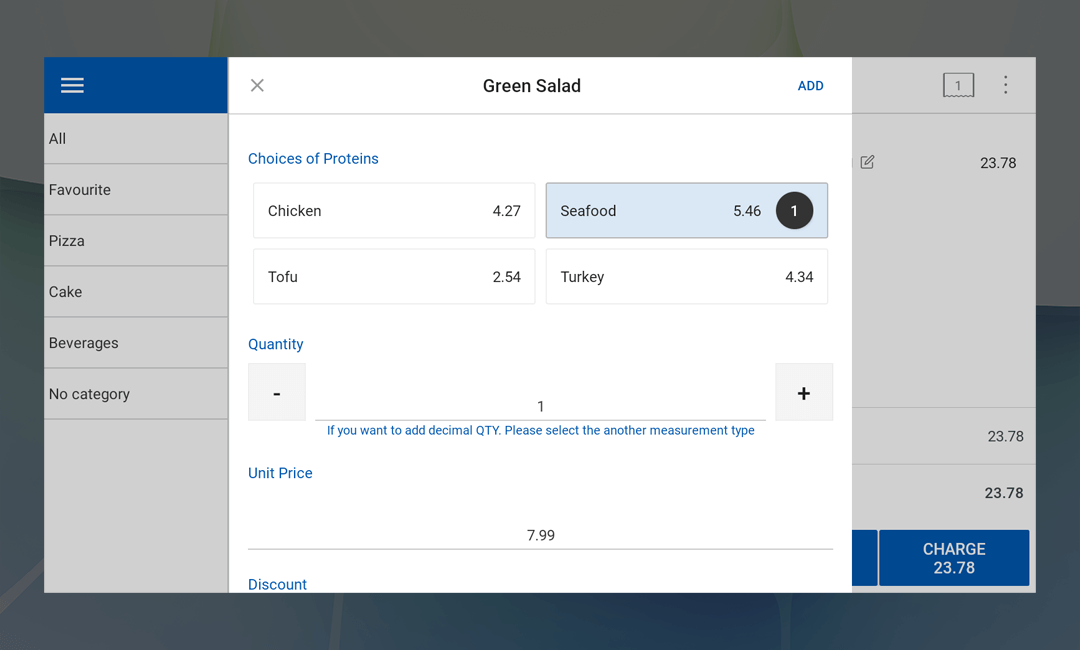
A modifier is an additional option or customization that your customers can select to personalize a menu item according to their preferences or dietary requirements. It allows customers to make specific changes or additions to an item, enhancing their dining experience by providing flexibility and choice. For example, a modifier could be selecting the level of spiciness for a dish, adding extra toppings to a pizza, choosing a side dish for a main course, or specifying the cooking preference for a steak. These modifiers give your customers the ability to customize their orders to suit their individual tastes and needs.
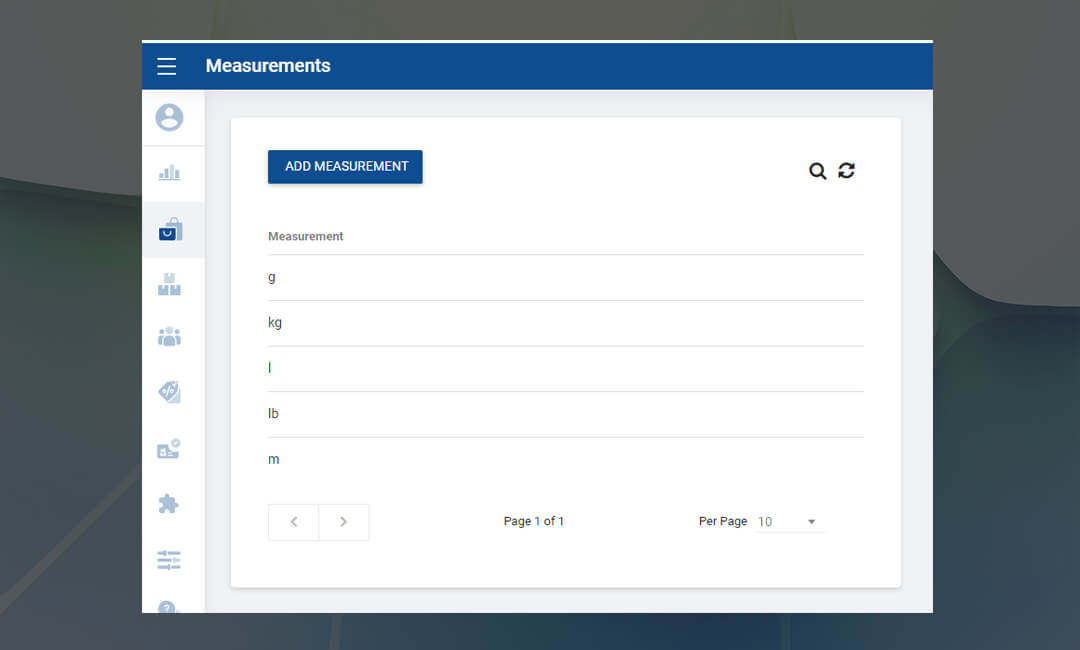
SalesPlay Back Office Main Menu > Products > Measurements
In SalesPlay, users have the flexibility to utilize various measurement types to accommodate different preferences and requirements. By default, SalesPlay supports measurement units such as grams (g), kilograms (kg), liters (l), pounds (lb), and meters (m). However, users also have the option to add additional measurement types to suit their specific needs.
In SalesPlay, users can access a range of features in the settings menu to customize their experience and tailor the POS system to their specific needs. However, it's important to note that to utilize these features, users must first enable them and save the settings. This ensures that the changes made in the settings menu are applied effectively throughout the system.
2.1.1 Open Orders Feature: Save and Hold Receipts for Flexible Transactions
SalesPlay Back Office Main Menu > Settings > Features > Open Orders
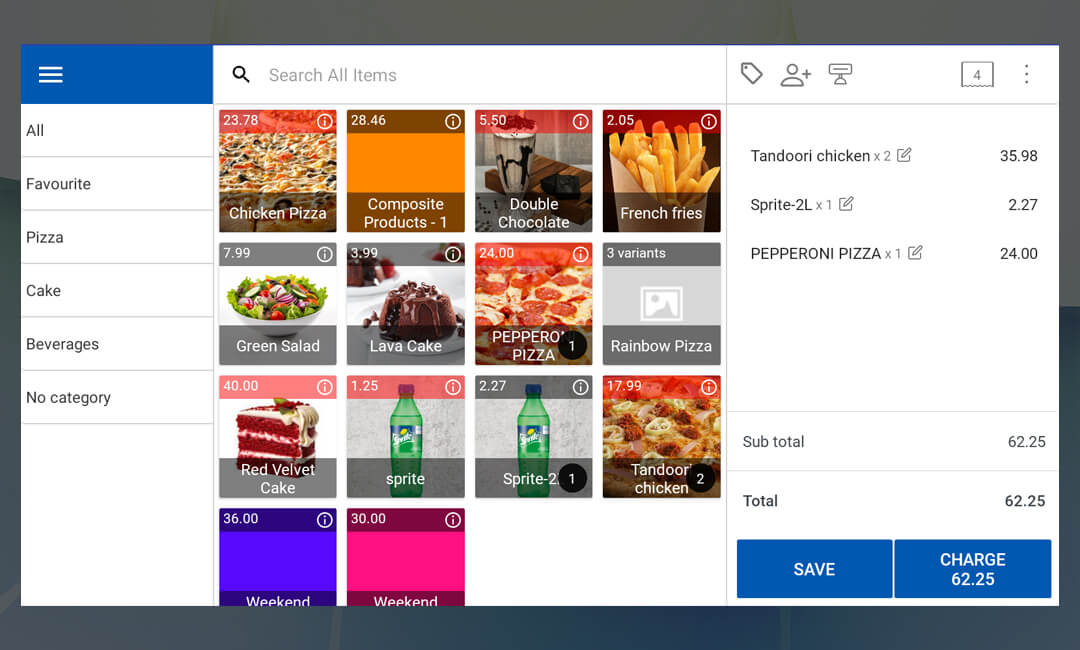
The "Open Orders" feature provides the flexibility to save and hold receipts, allowing for seamless and efficient transactions, especially in dynamic ordering environments such as restaurants and cafes. Imagine a scenario where a customer at a supermarket or a restaurant decides to add more items to their cart or order. In such situations, cashiers can utilize the "Save" button to put the sale on hold, accommodating the customer's need for additional items without disrupting the billing process. Once the customer returns to complete their transaction, cashiers can easily recall the held receipt using the "Open Orders" button, located conveniently on the bottom. This feature streamlines the ordering process, enabling businesses to keep multiple orders open and editable until they are fully paid, enhancing customer satisfaction and operational efficiency.
SalesPlay Back Office Main Menu > Settings > Features > Shift Management
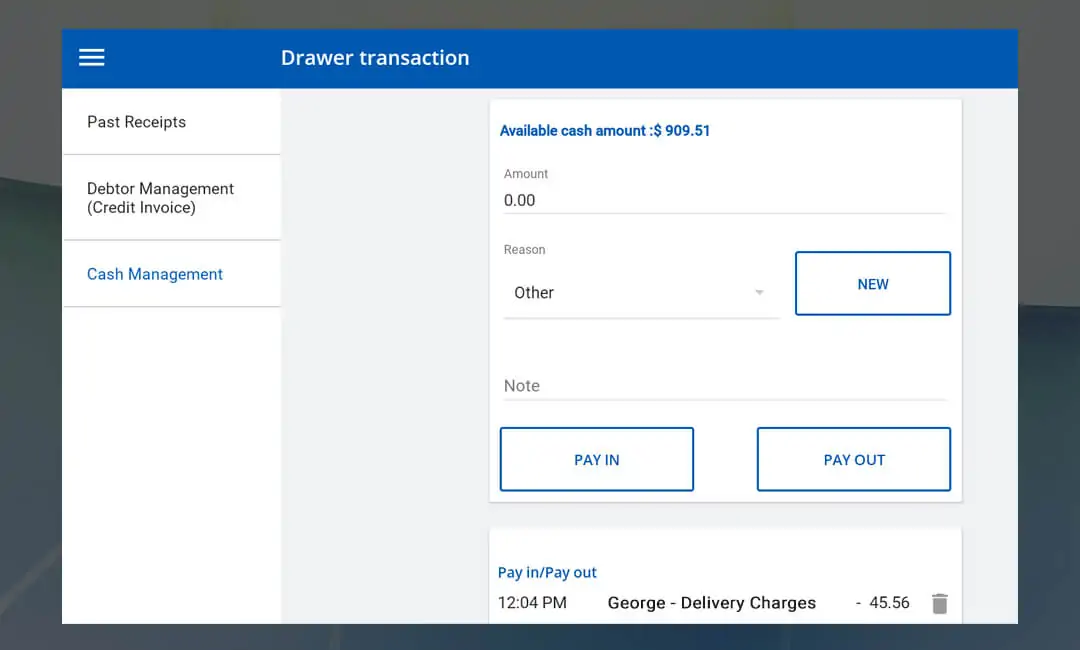
With the "Shift Management" feature, you can effectively track employee shift start and end times, as well as cash transactions, ensuring smooth operations and accountability. Once the feature is enabled, users will gain access to a new option called "Drawer Reasons" in the settings section. By selecting the "Drawer Reasons" section and clicking on "Add Drawer Reasons," users can easily create and customize drawer reasons by entering the reason name and saving the changes. This feature enhances transparency and control over cash handling processes, allowing businesses to monitor and manage employee shifts and cash transactions with ease.
SalesPlay Back Office Main Menu > Settings > Features > Time Clock
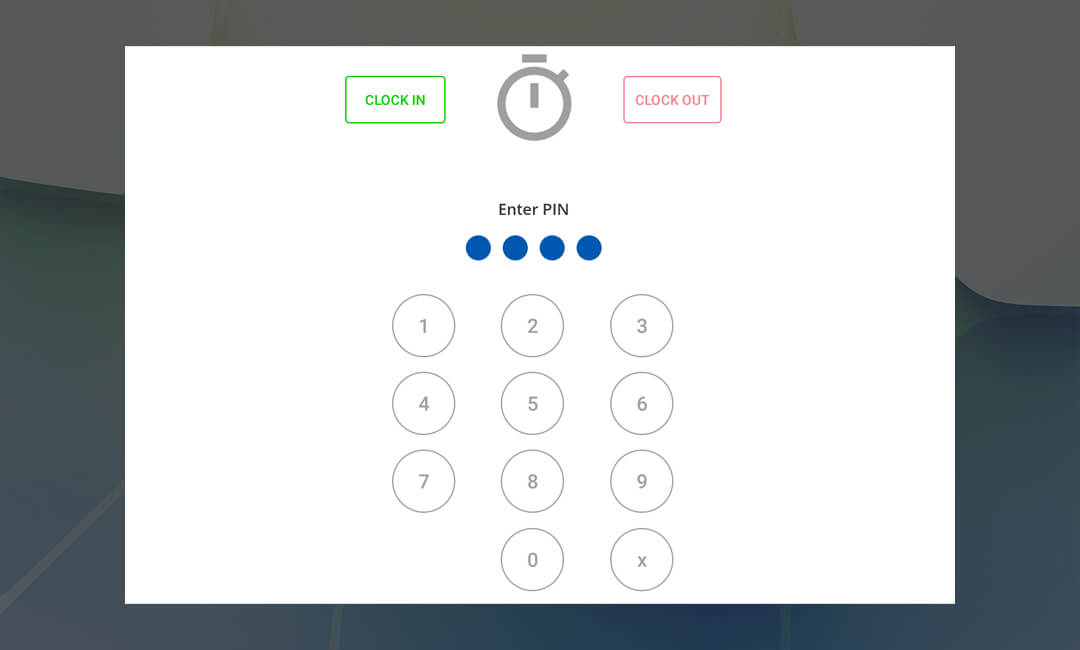
SalesPlay Time Clock feature offers businesses a convenient solution for tracking employee attendance time and working hours effectively. With this option, employees can easily Clock-In at the beginning of their shift and Clock-Out at the end, streamlining the process of tracking their work hours. The Time Clock feature records employees' clock in and out times, allowing businesses to accurately calculate their total work hours. By utilizing this feature, businesses can ensure compliance with labor regulations, monitor employee attendance, and efficiently manage payroll processes.
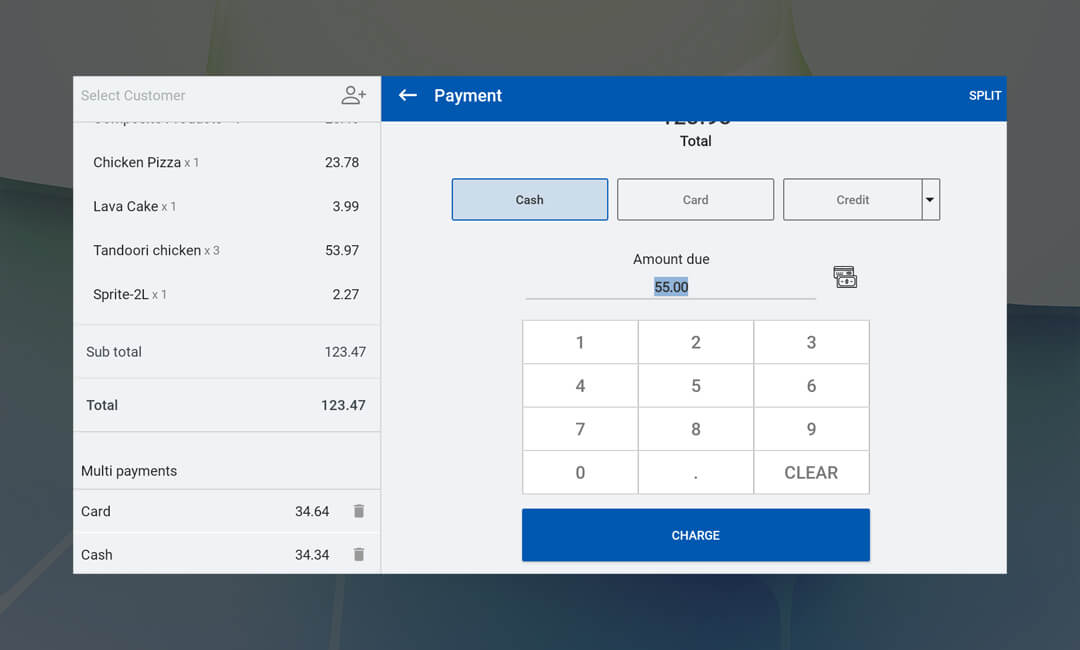
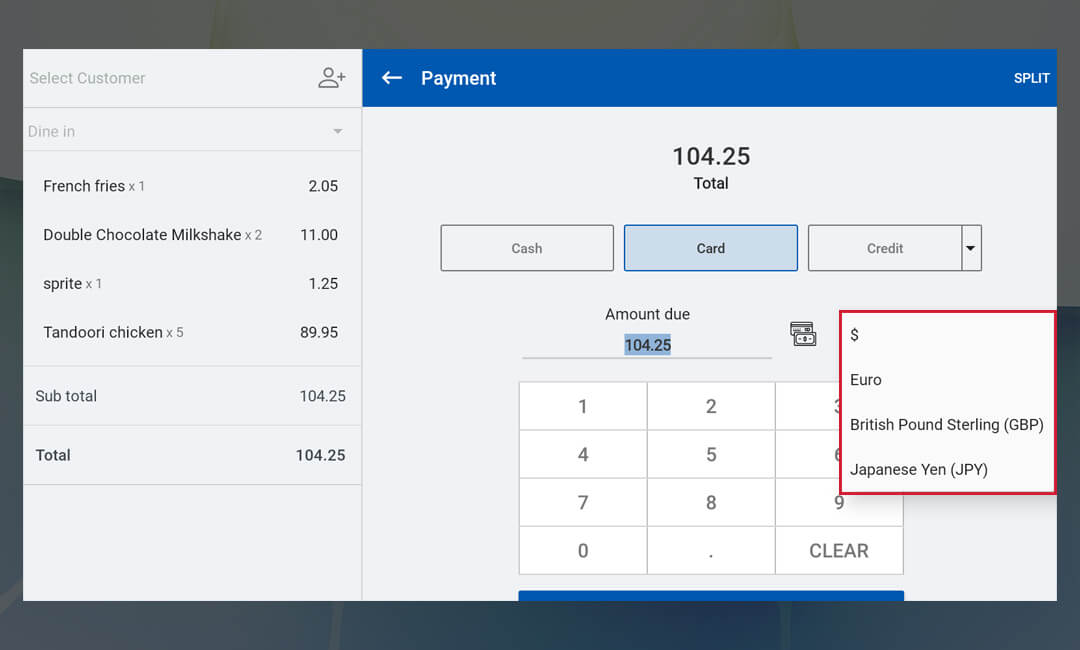
SalesPlay Multipayment feature empowers businesses to accept payments in various methods, providing customers with flexibility and convenience during transactions. With this feature enabled, users can facilitate multi-payment transactions, allowing customers to split payments across different payment methods as needed. For instance, a customer can choose to pay a portion of their receipt using cash and the remaining balance using a card. This capability enhances the checkout experience, accommodating diverse customer preferences and payment scenarios. By enabling Multipayment, businesses can streamline their payment processes, increase customer satisfaction, and improve overall efficiency at the point of sale.
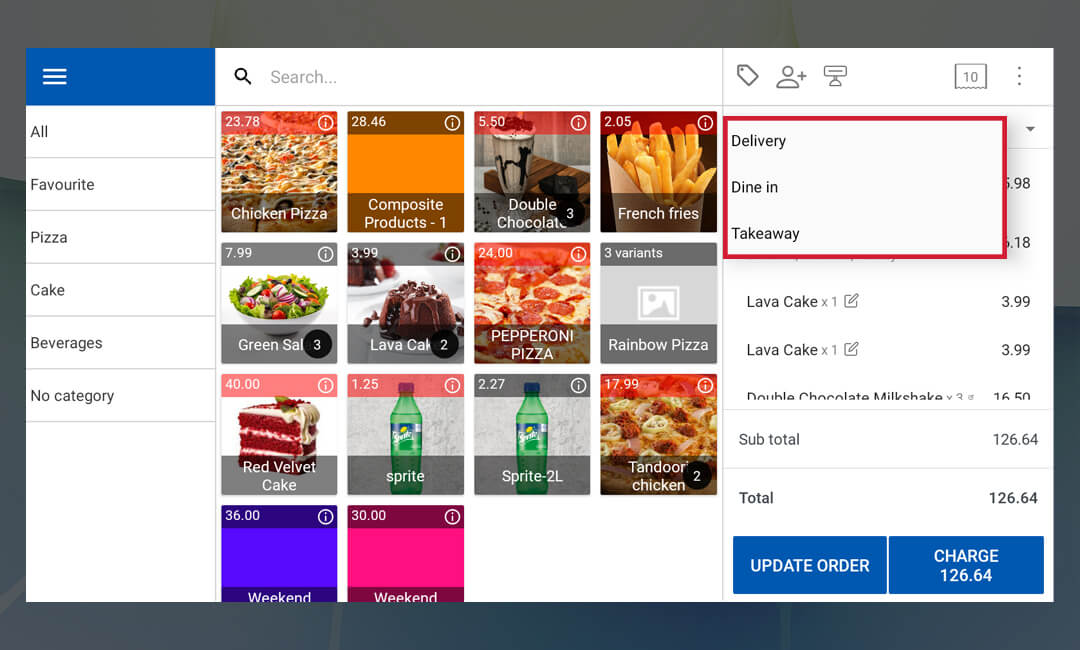
SalesPlay Back Office Main Menu > Settings > Features > Order Types
SalesPlay Order Types feature allows you to maintain multiple order types to accommodate diverse customer preferences. With this feature, you can easily manage order types such as dining, delivery, and take away, providing flexibility and convenience for customers. Whether customers prefer to dine in at the restaurant, have their orders delivered to their doorstep, or opt for take away, you can efficiently process orders according to their preferred channel. This capability enhances customer satisfaction and ensures smooth operations across different order fulfillment methods, ultimately contributing to a positive customer experience.
SalesPlay Back Office Main Menu > Settings > Features > Table/ Room
SalesPlay Table/Room Allocation feature provides you with the capability to allocate tables or rooms and track sales processes seamlessly. You can choose between two layout options: Standard Layout and Graphical Layout, each offering unique advantages.
Standard Layout: With the Standard Layout, you can define tables or rooms and assign them to specific locations such as the 1st floor, 2nd floor, pool area, or bar area. This layout option is straightforward and easy to use, allowing users to select tables directly from the main billing interface and assign them to receipts.
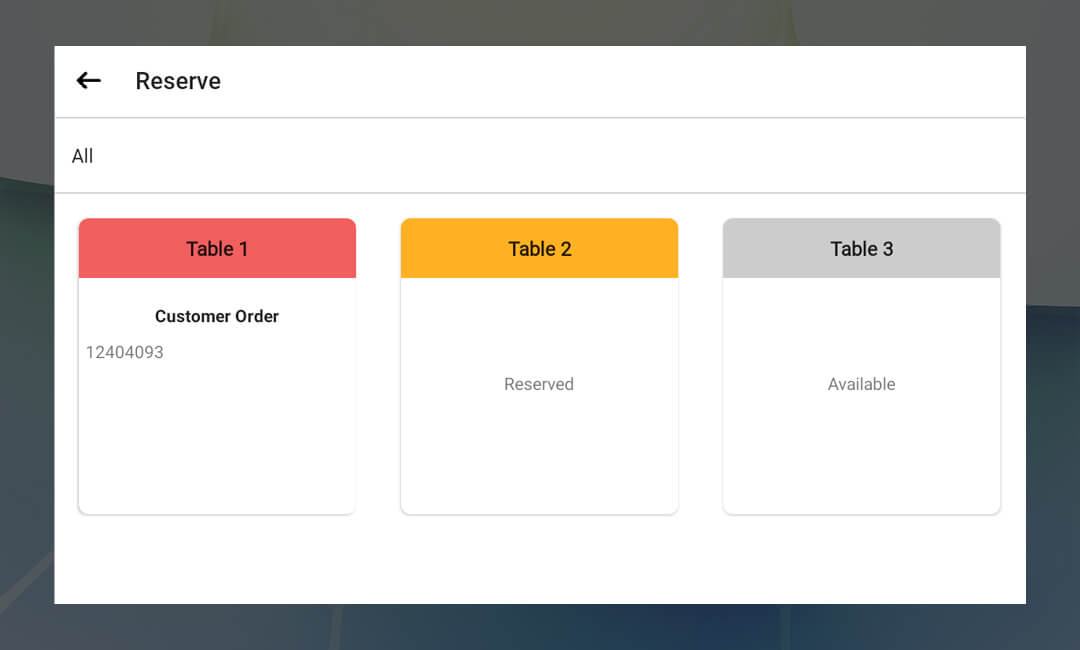
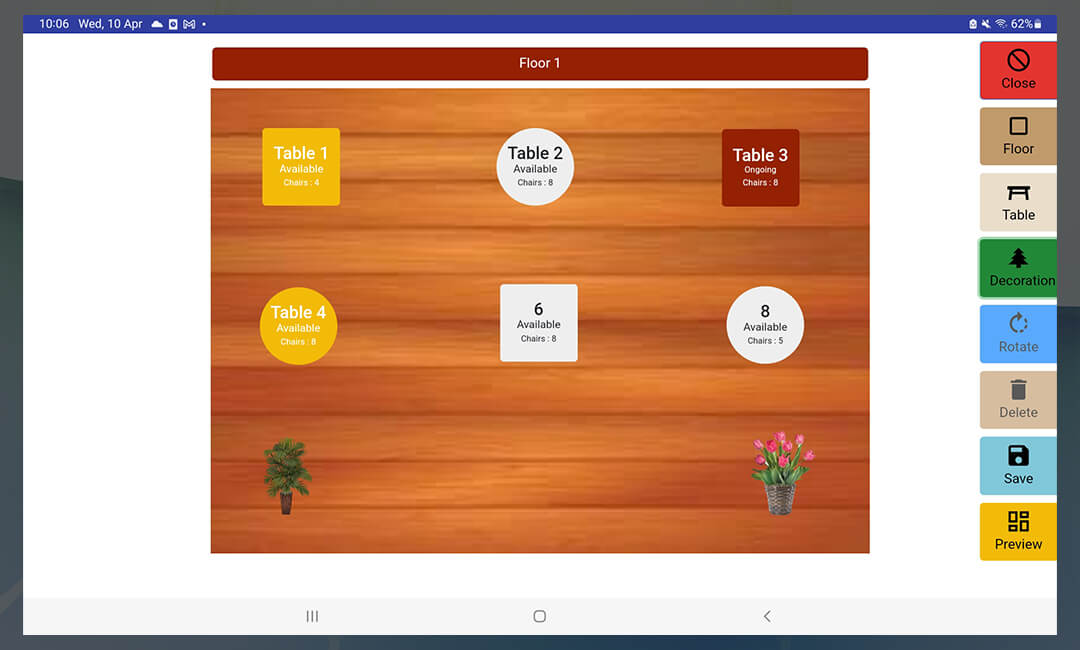
Graphical Layout: For a more user-friendly and visually appealing experience, SalesPlay offers the Graphical Layout option. This feature provides a graphical design tool that helps you arrange floor plans with customizable options. It supports multiple floor areas and allows for efficient management of tables.
Please note that the Graphical Layout option is currently available only on Android devices operating in landscape mode on screens exceeding 10 inches. Additionally, an internet connection is required to operate this feature.
Select Option: Users have the flexibility to choose between the Standard Layout and Graphical Layout options based on their preferences and operational needs. It's important to note that users cannot use both layout options simultaneously. If users activate QR ordering and change the layout option, they should choose the tables again and generate the QR code accordingly.
By utilizing the Table/Room Allocation feature in SalesPlay, you can streamline your sales processes and enhance efficiency in managing table allocations, ultimately improving the overall customer experience.
SalesPlay Back Office Main Menu > Settings > Features > Notification Settings
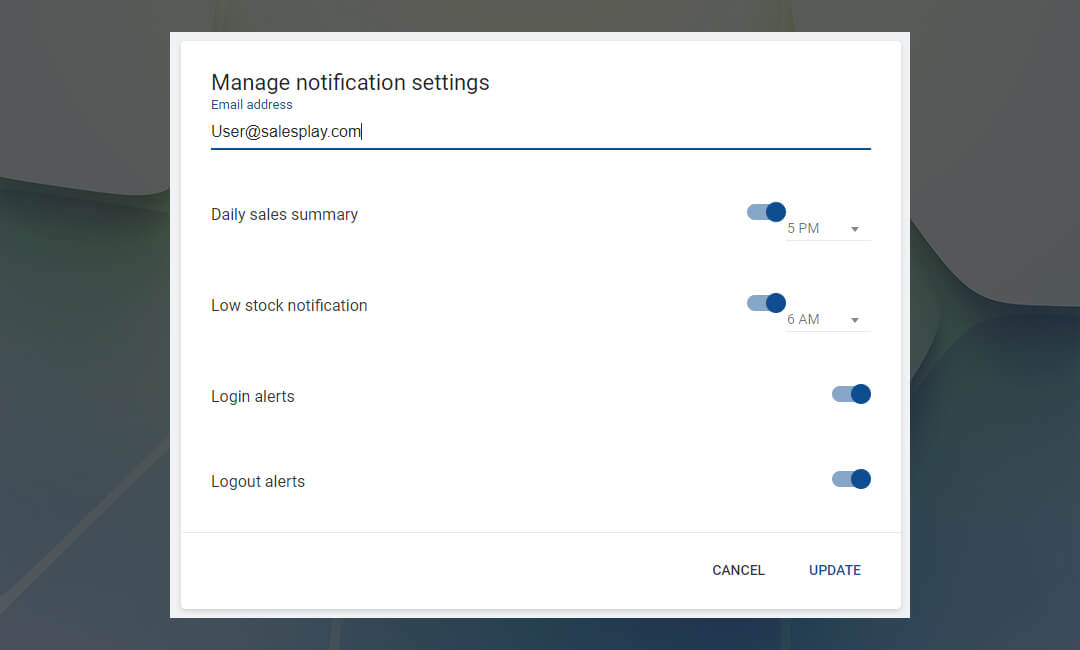
Notification Settings feature enables you to receive alerts for various events, keeping you informed and in control of their operations. Users can manage their notification preferences conveniently within the system.
Email Address: Users can specify their email address to receive notifications directly to their inbox.
Daily Sales Summary: Receive daily summaries of sales activities, providing valuable insights into daily performance.
Low Stock Notification: Stay informed about low stock levels, ensuring timely restocking to prevent inventory shortages.
Login Alerts: Receive alerts whenever a user logs into the system, enhancing security and oversight of user activities.
Logout Alerts: Get notified when a user logs out of the system, allowing for real-time monitoring of user activity.
By configuring these notification settings, users can customize their alerts according to their preferences and operational needs, ensuring efficient management and oversight of their business processes.
SalesPlay Back Office Main Menu > Settings > Features > Addon apps
SalesPlay Addon Apps allows you to enable addons that streamline and enhance various aspects of business processes. you can use these apps to tailor the system to your specific needs and requirements.
By enabling these addon apps, you can streamline your operations, improve customer service, and optimize your overall workflow for greater efficiency and satisfaction.
SalesPlay Back Office Main Menu > Settings > Features > KOT/BOT notes
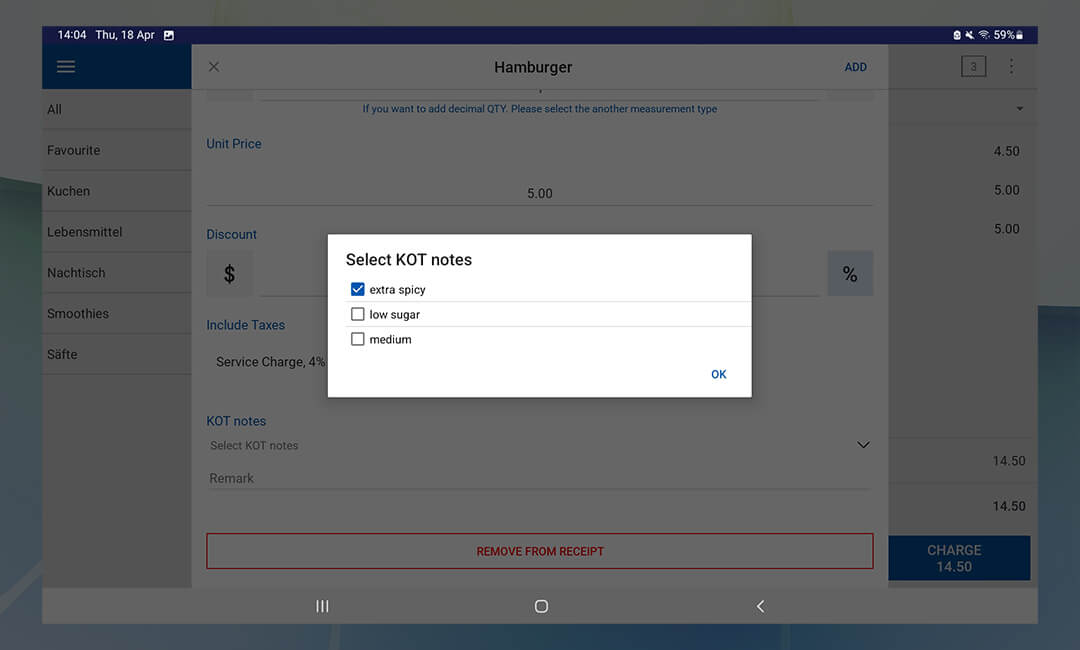
KOT (Kitchen Order Ticket) Notes feature empowers you to send orders to the kitchen with more specific details, ensuring clear and accurate communication between front-of-house and kitchen staff. With this feature, you can include detailed instructions or special requests related to food preparation, cooking preferences, or any other specific requirements for each order. By providing kitchen staff with comprehensive information through KOT Notes, you can minimize errors, improve order accuracy, and enhance overall customer satisfaction. This capability is particularly valuable in busy restaurant environments where precise order communication is essential for delivering high-quality service. With SalesPlay KOT Notes, you can streamline your kitchen operations and ensure a seamless dining experience for your customers.
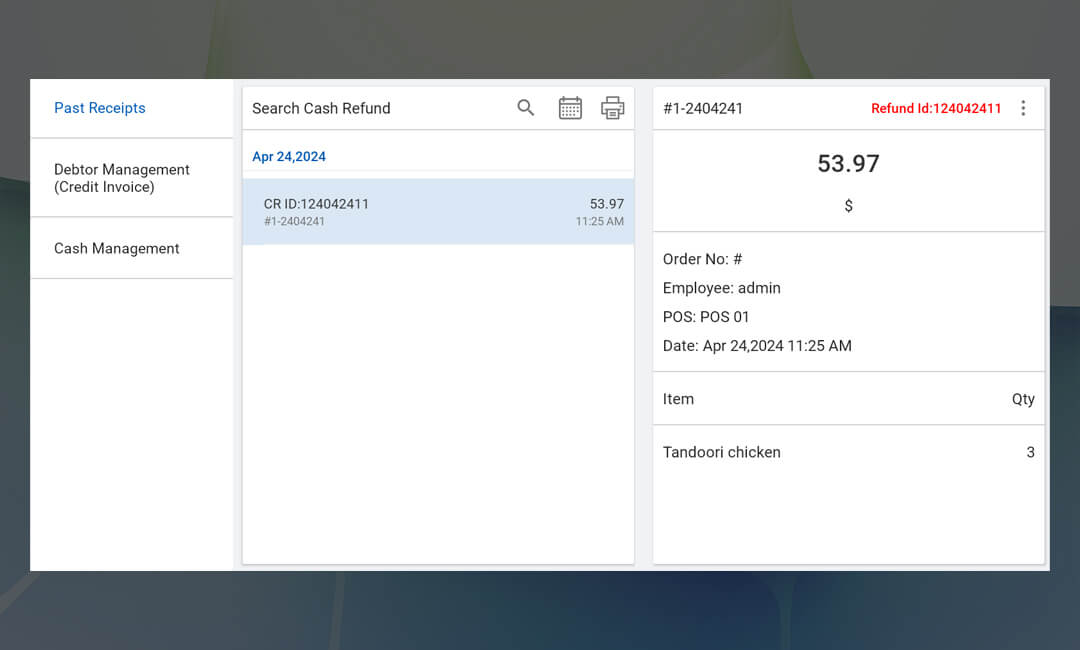
SalesPlay Back Office Main Menu > Settings > Features > Credit Note
Credit Notes feature enables you to issue credit notes to customers, indicating the return of incorrect or damaged products. Credit notes serve as a formal acknowledgment of the return and facilitate the process of providing refunds or credits to customers. Whether products are returned due to inaccuracies in the order or damage during transit, credit notes help businesses maintain transparency and accountability in their return and refund processes. By utilizing the Credit Notes feature, you can efficiently manage returns, uphold customer satisfaction, and maintain a positive relationship with their clientele.
SalesPlay Back Office Main Menu > Settings > Features > Embedded Barcodes
Embedded Barcode Scanning feature enables you to scan barcodes that include embedded weight or price information. This functionality streamlines the process of product identification, as users can simply scan the barcode to retrieve detailed product information, including weight or price. By leveraging embedded barcodes, you can expedite checkout processes, enhance inventory management accuracy, and improve overall operational efficiency. This feature is particularly beneficial for industries where precise product identification and pricing are critical, such as retail and grocery. With SalesPlay Embedded Barcode Scanning, you can optimize your workflow and provide customers with a seamless shopping experience.
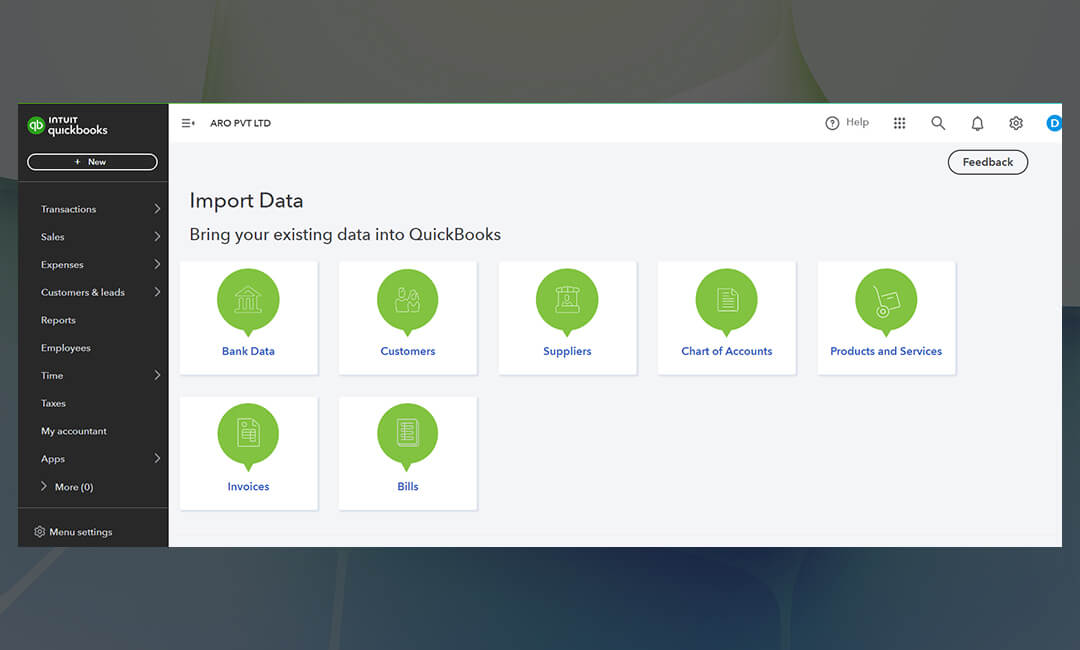
SalesPlay Back Office Main Menu > Settings > Features > Quickbook Integration
SalesPlay - QuickBooks Integration feature allows you to streamline their accounting processes by seamlessly integrating SalesPlay POS data with QuickBooks. As part of this integration, you have the option to download data in CSV (Comma-Separated Values) file format. CSV files are widely compatible with accounting software, including QuickBooks, and provide a convenient way to transfer data between systems. By downloading data in CSV format, you can efficiently import sales, inventory, and other transactional data into QuickBooks, simplifying accounting tasks and ensuring accurate financial records. With SalesPlay - QuickBooks Integration feature and CSV file downloads, you can improve your accounting efficiency and accuracy, ultimately saving time and resources.
SalesPlay Back Office Main Menu > Settings > Features > Xero
SalesPlay - Xero Integration feature allows you to seamlessly connect with the Xero accounting software, facilitating the transfer of daily sales records to prepare financial reports. By integrating SalesPlay POS data with Xero, you can automate the process of transferring sales data, eliminating the need for manual entry and reducing the risk of errors. This integration enables you to streamline your accounting process, improve accuracy in financial reporting, and gain valuable insights into your financial performance. With SalesPlay - Xero Integration feature, you can efficiently manage your accounting tasks and focus on growing your business.
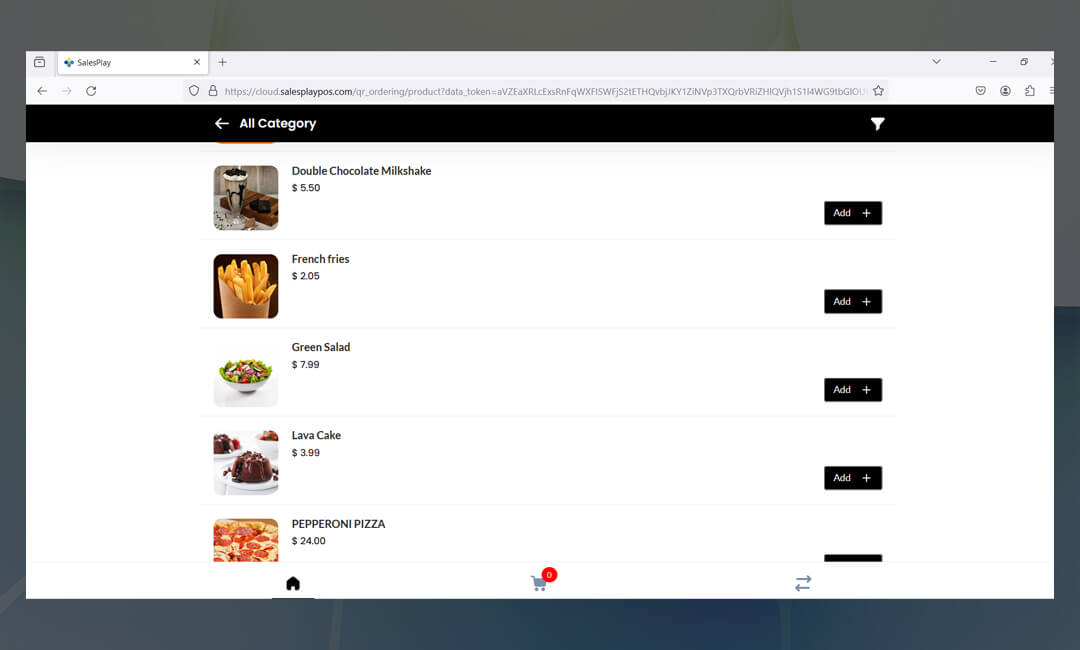
SalesPlay Back Office Main Menu > Settings > Features > QR Ordering / Web store
SalesPlay Back Office Main Menu > Settings > Features > QR Ordering / Web store
SalesPlay Estimation feature enables you to create estimations, also known as pro forma invoices or quotes, to provide preliminary documents to potential customers. These documents serve as a preview of the products or services offered by the seller and include details such as pricing, quantities, and terms of sale. Estimations are useful for initiating discussions with potential customers, outlining proposed transactions, and establishing expectations before finalizing a sale. By utilizing SalesPlay Estimation feature, you can effectively communicate with customers, build trust, and increase the likelihood of converting leads into sales.